
1Field Kit Supplies#
This guide covers two builds: a Team Practice Kit (one team's side of the field, enough to practice every scored task) and the Competition Field (both sides, used at ARC events). Teams should strongly consider building the practice kit. If cost is a problem, build a partial kit or share one with another team.
Notes:
- Components may change based on availability. ARC events will use the closest available replacement.
- STEM-ED INC is not sponsored by and does not endorse any supplier. Teams are not required to buy through these links.
- K'NEX parts may be any color. Color does not affect scoring.
1.1Field Components#
| Name | Acronym | Item | Practice Kit Qty | Competition Qty | Instructions |
|---|---|---|---|---|---|
| Mine Shaft | MS | 18" x 18" x 28" cardboard box, weighted | 4 | 4 | Section 2.1 |
| Tool Shape | TA | 1-ft circle, square, or triangle in red, blue, or green | 9 (all combinations) | 9 (4 in play per flight) | Section 2.2 |
| Base Camp / Launch Pad | BC | Landing pad | 1 | 2 | Section 2.3 |
| Supply Depot | SD | Landing pad, marked green | 4 | 4 | Section 3.2 |
| Brick | BR | K'NEX cube, 20 parts | 10 | 20 | Section 3.1 |
| Depot Material | DM | K'NEX hub, 4 parts | 4 | 8 (4 per team) | Section 3.3 |
| Stockpile | SP | 4 ft x 4 ft marked square | 1 | 2 (blue, red) | Section 3.4 |
| Foundation | FD | K'NEX parts bag, 40 parts | 1 | 2 | Section 4.1 |
| Reinforced Foundation add-on | RFD | K'NEX parts bag, 20 parts | 1 | 2 | Section 4.2 |
| Height Gauge | — | 7-ft board marked at 1, 2, 4, 6 ft | 1 | 2 | Section 4.3 |
| Tether | — | 35-ft line, carabiners, cinder block | 1 | 2 lines | Section 5 |
1.2K'NEX Parts Totals#
Order about 10% extra in case the parts are broken. Bricks break during matches, and broken Bricks stay with the team for Phase 2 (Rulebook 3.3.2).
| Part | Practice Kit | Competition Field | Source |
|---|---|---|---|
| Rod, 128 mm (any color) | 168 | 336 | K'NEX Replacement Parts |
| 3-way connector | 92 | 184 | Red 3-way connector |
| 2-way connector | 4 | 8 | K'NEX Replacement Parts |
| 4-way connector | 4 | 8 | K'NEX Replacement Parts |
| 5-way connector | 8 | 16 | K'NEX Replacement Parts |
1.3Other Materials#
| Item | Used For | Practice Kit Qty | Source |
|---|---|---|---|
| Corrugated box, 18" x 18" x 28", 200-test | Mine Shafts | 4 (sold in bundles of 10) | Uline S-4758 |
| Sand bags, ~10 lb, or 2 bricks/pavers | Mine Shaft weight | 8 (2 per shaft) | Any hardware store |
| Cardboard or 1/4" plywood, 17" x 17" | Mine Shaft floor insert | 4 | Leftover box flaps work |
| Matte foam board, red, blue, green (20" x 30") | Tool Shapes | 2 of each color (6 total) | Dollar or craft store |
| Landing pad (pack of 2) | Base Camp, Supply Depots | 3 packs | Same as last season |
| Green duct tape or green marking paint | Marking Supply Depots | 1 roll | Hardware store |
| Rope or flat ground marker, blue and red | Stockpile outline | 16 ft per Stockpile | Hardware store |
| 1" x 2" board, 8 ft | Height Gauge | 1 | Hardware store |
| Polypropylene cord (90 ft) | Tether | 1 | Same as last season |
| Carabiner (2-pack) | Tether | 1 | Same as last season |
| Cinder block | Tether anchor | 1 | Same as last season |
| Soccer cones, red and yellow | Field boundary | 16 each | Any sporting goods |
1.4Tools#
| Tool | Notes |
|---|---|
| Measuring tape, 50 ft or longer | Measuring tether and field |
| Pen, marker, pencil | Marking cuts |
| Ruler or straightedge, 12" or longer | Laying out Tool Shapes |
| Scissors | Strong enough to cut tether line |
| Utility knife | Cutting foam board and box flaps |
| Packing tape | Sealing Mine Shaft bottoms |
| Glue or double-sided tape | Optional, for Tool Shapes |
Use caution with sharp tools. Have a coach or supervisor present and work in pairs.
2Round 1 Components: The Mines#
Round 1 uses 4 Mine Shafts, the Tool Shapes inside them, 1 Base Camp, and the tether. Only one team flies at a time.
| Name | Item | Instructions |
|---|---|---|
| Mine Shaft (MS) x4 | Weighted cardboard box | Section 2.1 |
| Tool Shape x4 in play | Colored foam-board shape | Section 2.2 |
| Base Camp (BC) x1 | Landing pad | Section 2.3 |
| Tether x1 | Line and cinder block | Section 5 |
2.1Mine Shaft#
Materials for 1 Mine Shaft: 1 box (18" x 18" x 28"), 2 sand bags or pavers, 1 floor insert (17" x 17"), packing tape, black marker.
Tools: utility knife, measuring tape, packing tape.
Step 1: Assemble the box. Stand the box so the 18" x 18" faces are top and bottom. The box is 28" tall. Fold and tape the bottom flaps closed with at least 3 strips of packing tape.
Step 2: Remove the top flaps. Cut off all 4 top flaps with the utility knife orr securely tape them down and out of the opening. Loose flaps flap in rotor wash and block the camera.
Step 3: Add weight. Place 2 sand bags or pavers flat on the box floor, side by side to prevent the empty box will blow over or slide under a hovering drone.
Step 4: Add the floor insert. Lay the 17" x 17" insert on top of the weights. This gives the Tool Shape a flat, level surface.
Step 5: Number the box. Write the shaft number (1, 2, 3, or 4) on one outside face in black marker, 4" tall. Do not mark the outside with any shape or color
2.2Tool Shapes#
The rulebook allows 9 shape-and-color combinations; 4 are in play at each flight. Build all 9 for practice so computer-vision code is tested on every combination, not just four.
| Shape | Size | Colors to build |
|---|---|---|
| Circle | 12" diameter | Red, blue, green |
| Square | 12" x 12" | Red, blue, green |
| Triangle | 12" x 12" square cut corner to corner (two 12" sides at a right angle) | Red, blue, green |
Step 1: Lay out the shape. Measure and mark on the back of the foam board. For the circle, tie a string to a pencil, hold the string 6" from the pencil at the center point, and trace.
Step 2: Cut. Cut with the utility knife in several light passes. One 20" x 30" board fits 2 shapes side by side, so buy 2 boards per color.
Step 3: Add color. For competition, we will be spray painting the boards with colors needed.
Step 4: Place in the shaft. Lay one shape face up, centered on the floor insert. Change shapes between flights as the Tool Assignment changes.
2.3Base Camp#
Base Camp is a standard landing pad. No assembly is needed. Stake or weight its edges so rotor wash does not lift it.
3Round 2 Phase 1: Mine & Build#
Round 2 Phase 1 is flown head-to-head on the same 40-ft-radius field. Each team needs a Launch Pad and a Stockpile; both teams share the Bricks and the 4 Supply Depots.
| Name | Item | Competition Qty | Instructions |
|---|---|---|---|
| Brick (BR) | K'NEX cube | 20 | Section 3.1 |
| Supply Depot (SD) | Green landing pad | 4 | Section 3.2 |
| Depot Material (DM) | K'NEX hub | 8 (4 per team) | Section 3.3 |
| Stockpile (SP) | 4 ft x 4 ft square | 2 (blue, red) | Section 3.4 |
| Launch Pad | Landing pad | 2 | Section 2.3 |
| Tether | Line and cinder block | 2 lines | Section 5 |
3.1Brick#
Materials for 1 Brick: 12 rods (128 mm), 8 3-way connectors. A finished Brick is a cube about 6" on each side.
Step 1: Build the bottom square. Join 4 rods with 4 connectors to form a flat square, one rod per side (Rulebook Figure 3.3a).
Step 2: Build the top square. Repeat Step 1.
Step 3: Join the squares. Stand 4 rods upright, one at each corner of the bottom square, then press the top square onto them.
Build and test one Brick before ordering parts for all 20.
3.2Supply Depot#
A Supply Depot is a landing pad marked green. If the pad has a green side, use it face up. If not, tape a 4"- wide green ring around the pad's outer edge with green duct tape. Weight or stake the edges as in Section 2.3.
Do not use green on anything else on the field. Pilots and judges identify Depots by color.
3.3Depot Material#
Materials for 1 Depot Material: 1 5-way connector, 3 rods (128 mm).
Step 1: Assemble. Press one rod into each of 3 connector slots (Rulebook Figure 3.3b).
Step 2: Stage. Depot Material stays off the field. Bag 4 sets per team and hold them at that team's Build Area. The Field Judge hands over one set for each Depot the team landed on.
3.4Stockpile#
Materials for 1 Stockpile: 16 ft of rope (blue or red), 4 tent stakes or landscape staples.
Step 1: Mark the square. Measure a 4 ft x 4 ft square on the ground.
Step 2: Outline it. Lay the rope along all 4 sides and stake each corner flat to the ground. Rope must lie flat so a Brick resting on it does not tip.
On grass, marking paint is an option for events. Rope is better for practice because it moves with the layout.
A Brick counts when it settles inside the outline (Rulebook 3.3.2). Place Stockpiles according to the field layout in Section 6
4Phase 2 Components: Skyscraper Build Area#
Each team builds off the flying field, in its own Build Area, with a 5-minute clock. Each Build Area needs a flat surface, one Foundation bag, one RFD add-on bag (issued only if earned), the team's Depot Material, and a Height Gauge.
4.1Foundation#
Every team gets the same Foundation kit. Pack each one in a labeled zip bag.
| Part | Qty |
|---|---|
| Rod, 128 mm | 24 |
| 2-way connector | 4 |
| 3-way connector | 8 |
| 4-way connector | 4 |
| Total | 40 parts |
4.2Reinforced Foundation (RFD) Add-On#
Teams that score any autonomous Tool ID in Round 1 get this bag in addition to the Foundation. Pack it separately and label it "RFD."
| Part | Qty |
|---|---|
| Rod, 128 mm | 12 |
| 3-way connector | 4 |
| 5-way connector | 4 |
| Total | 20 parts |
4.3Tools#
See the table below for the tools needed to build a full field. When multiple links are provided, the first is the cheapest recommendation, while the last is the highest quality recommendation.
| Tool | Examples | Notes |
|---|---|---|
| Measuring Tape | Stanley 100 ft tape, Home Depot | Recommend at least 50’ for measuring tether and field as well as tower height |
| Writing Utensil(s) | Pen/ Marker/ Pencil | |
| Scissors | Crescent Wiss tradesman scissors, Home Depot | Strong enough to cut tether line. |
| Utility Knife | Utility knife, Amazon |
5Tether#
The tether anchors the drone to a cinder block at the field center (Section 6). A practice kit needs 1 tether line; the competition field needs 2.
Materials for 1 tether: 37 ft of polypropylene cord, 2 carabiners, 1 cinder block.
Tools: scissors, measuring tape.
Step 1: Cut the line. Cut 37 ft of cord: 35 ft of tether plus 2 ft to wrap around the block.
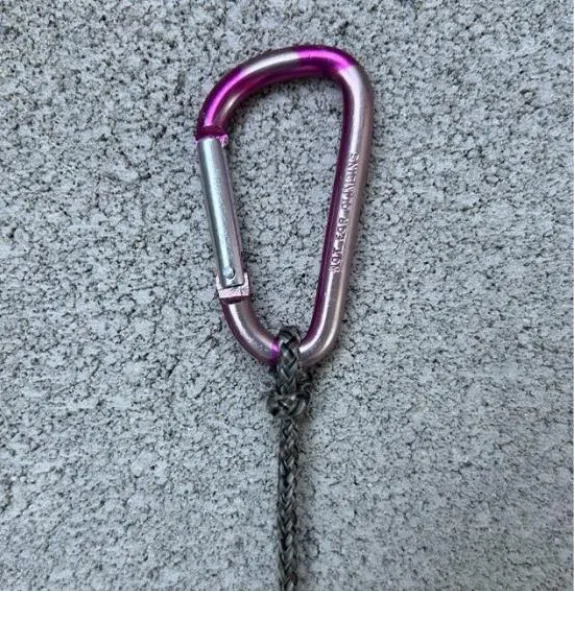
Step 2: Attach the carabiners (Figure 5.1). Tie a carabiner to each end of the line. Pull hard on the line to check that each knot holds. For help with knots, see these knot-tying tutorials.
Step 3: Wrap the block (Figure 5.2). Wrap the extra 2 ft of line around the center of the cinder block.
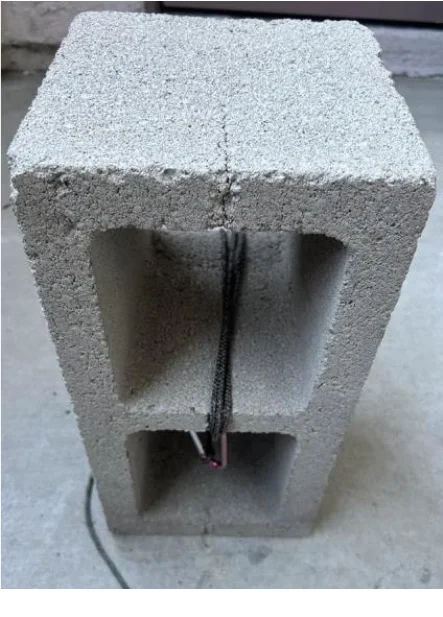
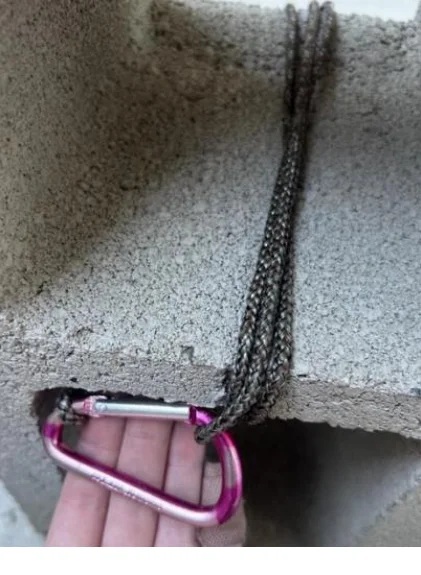
Step 4: Fasten the line. Clip the carabiner onto the line to close the loop around the block. The remaining 35 ft of line is the tether.
6Field Boundaries and Layout#
The field is a 40-ft-radius circle (80 ft across), down from last season's 50-ft tether field. Mark it before every flight so no one stands inside tether range. ARC events use red and yellow soccer cones; teams may use any clearly visible markers.
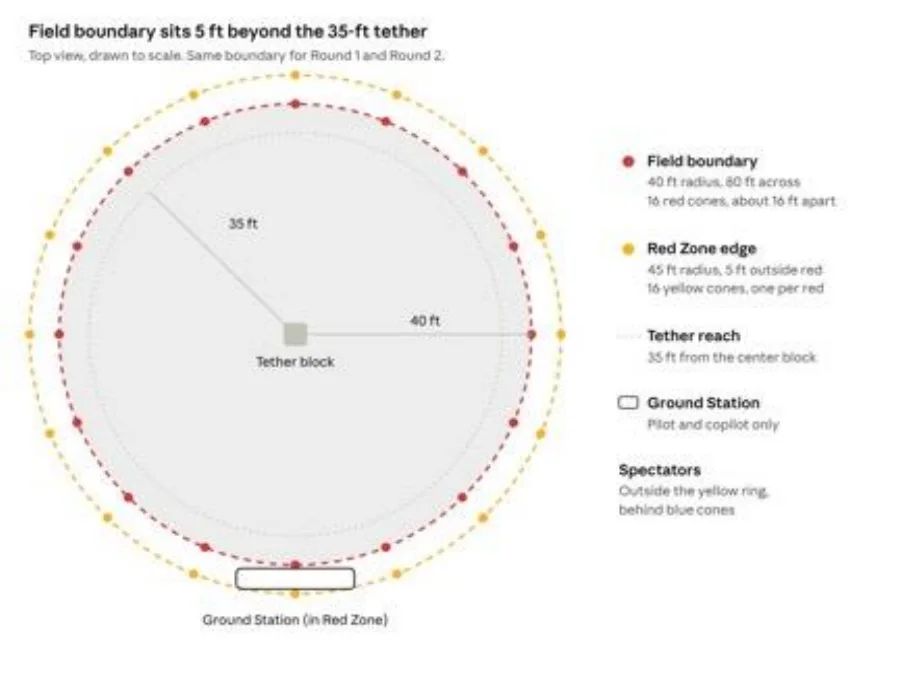
Step 1: Place the tether block at the field center.
Step 2: Mark the Field Boundary. Measure 40 ft from the block and place a red cone. Repeat around the circle for 16 red cones, about 16 ft apart. A 40-ft line tied to the block makes this fast.
Step 3: Mark the Red Zone. Place a yellow cone 5 ft outside each red cone (45 ft from center).
Step 4: Place the Ground Station table inside the Red Zone, between the red and yellow cones.
Revision History
| Revision | Release Date | Notes |
|---|---|---|
| A | 11/13/2025 | Initial Release |